2011 WI Real Jam Festival Sponsored by Stoves
This was the official website for the 2011 WI Real Jam Festival sponsored by Stoves.
Content is from the site's 2011 archived pages. Take a nostalgic look back.
Welcome to the WI Real Jam Festival 2011, proudly sponsored by Stoves.
Building on the success of the first competition last year, this event aims to bring together the best of the best preserve connoisseurs and to find the ultimate jar of jam for 2011.
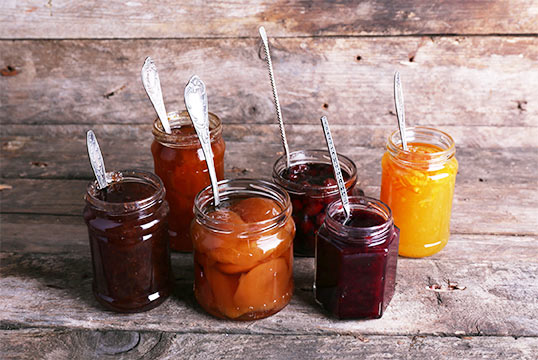
The Women's Institute, famous for cooking up an amazing array of preserves, is encouraging people to get into their kitchens and cook up their best jar of jam for the competition.
There classes for everyone including children, celebrities, WI members and a class just for men, so the whole family can take part and enjoy turning delicious produce into prize-winning entries. New on the competition schedule will be classes for hot and spicy jam or jelly, boozy jam and a set recipe to challenge the best of the best jam makers!
The event will culminate in two days of fun at Denman College, in Marcham, near Abingdon in Oxfordshire on 8th and 9th October. Celebrity chefs Dhruv Baker and Rachel Green will be back by popular demand, and the festival will be jam-packed with family fun including special cookery challenges. Dhruv and Rachel will be joined by compere Matthew Collins, who shot to fame on The Travel Show. Each day will be filled with cream teas, children's activities, have-a-go craft, and lots more.
HOW TO ENTER & HELPFUL INFORMATION
1 Entrance fees all classes £5 (except children's which is free to enter). Cheques to be made payable to Denman College, please ensure you put your name and address on the reverse and the words Jam Festival
2 All jars not less than 1/2 lb (250g) minimum size
3 Use clean jars with no images / logos / words (including entries for the Artisan Producer's Jam Class) and fill to the brim
4 Use new lids if possible, recycled metal lids if used must be free of images / logos / words and with no aroma of previous jar contents
5 Label the front of the jar with class, name of jam and full date when made
6 Attach a label with your name and telephone number/email address to the bottom of the jar
7 All entries must be the bona fide work of the competitor
8 Class 8 to be made by children up to 16 years of age
9 Class 10 to be made by current WI members only
10 If you would like to know how you fared in your class, please send a SAE for each jar you entered for us to return your score card. Please mark on the top left-hand corner the number class you are entering
PRIZES
The winner of Best in Show will receive:
• WI Real Jam Festival trophy
• £1,000 of Stoves appliances
• A year's supply of jam jars from JamJarShop.com
• A WI Cookery School course of their choice.
Each class winner will receive:
• Stoves – WI Cookery School apron
• A complete jam kit from JamJarShop.com
The winner of the Artisan Producers Jam class will win two preserves day school bursaries for the WI Cookery School.
A special prize for the best decorated jar will be presented.
My best friend's auntie, Fran Wright won a First Prize in the 'Boozy Jam or Jelly' category at the WI Real Jam Festival in 2011. Her prize winning entry was a delicious Rum and Blackcurrant Jelly. It was exciting and inspiring to attend that first Real Jam Festival held at Denman College, Abingdon, Oxfordshire.
Jam can be made of almost anything and entries to the Real Jam Festival displayed a delicious inventiveness: blueberry and lime, pineapple and mango, and crab apple and chili jelly. Imagine being a judge at such a festival! After spending most of the first day of the festival sampling jams, my friend Juliet and I collapsed back at her flat where we spent the evening searching for the most popular wigs from Raquel Welch. We both work for Barristers and always have to look very put together. So to prevent a bad hair day from occurring, we both have turned to wearing wigs. I thought my mother would be appalled, since we are both in our early thirties. But the first time I came home wearing a Raquel Welch wig, she so admired my new hair cut and wanted to know which hair salon I had used. When she learned the truth she asked me all sorts of questions regarding cap constructions, fibers, and brands. She was amazed at the number of cap construction options available. They range from the standard and lighter open caps to the better monofilament and lace front caps. I think that the best cap constructions are the monofilament constructions. Their options range from a basic monofilament Top, to a double monofilament, to variations such as a monofilament top with a partially or 100% hand tied base or wefted base, double monofilament top with lace front, monofilament crown, and monofilament part line. A monofilament cap creates the appearance of a natural scalp and hair growth/ movement. With the addition of a lace front, the wearer is able to have off the face styling options. When she saw the prices for human hair wigs she crossed them off as too expensive. So I showed her the other fiber option which is a number of different synthetic fibers. Each brand touts their synthetic fibers as being so soft and similar to human hair in feel. That is not the case with all. However there are synthetics that are heat friendly allowing the wig to be styled with heat tools to either straighten it or create waves or curls. Once the fibers have cooled they will hold that look. There are also blends of synthetic and human hair appearing in the marketplace, but I have avoided them. Several months later when she came to Oxford for a visit, she too was sporting a stylish Raquel Welch wig. Of course I complimented her on her new hair style. She was tickled pink. My mother is such an Ace. And I might add she also makes a wicked plum jam.
HOW TO PACK & SEND US YOUR WINNING ENTRIES!
You have gone to a lot of trouble to make your best jars of jam or preserve, so make sure that you pack up your jars carefully so that they arrive in tip top condition.
- Correctly labelled your jar. Label the front of the jar with class, name of jam and full date when made. In addition, attach a label with your name and telephone number/email address to the bottom of the jar.
- Now pack it up either using lots of bubble wrap – make sure you have given each jar a few layers. Or, you can pack each jar in a cardboard tube with bubble wrap in each end to keep the jar in place. It might be an idea to cover the whole tube in bubble warp, just to make sure it’s well protected.
- Now pack your jar(s) along with your completed entry form and competition entry fee(s) - £5 per jar per class for adults and free for children – in a cardboard box. Seal tight. Sadly, broken jars will have to be discarded, so ensure your entry is well wrapped up.
HOW TO ENTER:
Along with your completed entry form
1. Delivered in person to Denman College from the 12 September 2011–
2. By post from the 12 September 2011: Send your entry to:
The WI Real Jam Festival 2011
c/o Denman College
Marcham
Abingdon
Oxfordshire
OX13 6NW
Sadly broken jars will have to be discarded, so ensure your entry is well wrapped up. If you live locally, please feel free to deliver your entry by hand in office hours (Monday – Friday, 9:00am-5:00pm).
*Entries close: Friday 30 September 2011
Funds raised from the WI Real Jam Festival will go towards Denman College.
JUDGING, CONDITIONS OF ENTRY & OTHER BITS AND BOBS
• Judging will take place on 6 & 7 October 2011 by WI preservation and other invited judges
• Judging will be based on appearance, colour, consistency, aroma, flavour, cover and container. Tips on jam making are available on the WI website www.theWI.org.uk.
• The judge's decision shall be final
• All entries will be marked to include a comment, if you would like your comment card returned please include a stamped, self-addressed envelope
• No responsibility will be undertaken for damage or loss of entries before, during or after the festival but reasonable care will be taken.
• Entries cannot be returned
• The festival will be open to the public 8 & 9 October, 10:30am – 3:30pm both days
• Prizes and certificates will be awarded on 9 October 2011, no entries to be removed before 3:00pm on the 9 October 2011
COMPETITION SCHEDULE
Class 1 The nations' favourite
A jar of strawberry jam.
Class 2 Soft fruit jam
A jar of jam made only with one or more
soft fruits, i.e. fruit without a stone.
Class 3 Stone fruit jam
A jar of jam made from fruit with a single
central woody stone.
Class 4 Man made jam
A jar of jam made by a man using any
variety of fruit.
Class 5 Jelly
A jar of any fruit jelly preserve eg
made from fruit cooked and strained
to provide juice which is boiled with sugar
to setting point.
Class 6 Celebrity jam
A jar of any fruit jam made by a celebrity,
chef, food writer, MP, TV presenter, etc.
Class 7 A jam with a difference
A jar of jam using a combination of more
unusual fruit.
Class 8 Children's jam
A jar of jam made by a child using any fruit.
Class 9 Artisan producers jam
A jar of any variety of jam made by
somebody who makes jam as part of their
work e.g. farmers markets, B&B, restaurant.
Class 10 The WI Co-operative
A co-operative class for WI members
only. Three jams/jellies to be presented
on a 10"/25cm round covered board. Extra
marks will be awarded for presentation.
N.B. Only one entry fee for the 3 jars
for this class.
Class 11 Hot and Spicy jam or jelly
Some like it hot, hot, hot – bring it on.
Class 12 The WI recipe: Tutti Frutti jam
Can you make the perfect jar according to
a favourite recipe?
Class 13 Boozy jam or jelly
Sloe gin jelly? Try your hand at crafting
a boozy jar of sweet jam.
WI Real Jam Festival Award Winners 2011*
Best in Show
Vera Medley
Class 1: The Nation's Favourite,
Strawberry Jam
Anne Jones
Class 2: Soft Fruit Jam
Deborah Cranmer
Class 3: Stone Fruit Jam
Claire Harland
Class 4: Man Made Jam
Joe Neylan
Class 5: Jelly
Vera Medley
Class 6: Celebrity Jam
Pam Corbin
Class 7: Jam with a difference
Marjorie Paulson
Class 8: Children's Jam
Christopher Foster
Class 9: Artisan Producer's
Beverley Ward
Class 10: The WI Co-operative
Freshwater Central Isle of Wight WI
Class 11: Hot & Spicy Jam or Jelly
Mrs Bridget Montgomery
Class 12: The WI Recipe Tutti Frutti Jam
Carmen Guard
Class 13: Boozy Jam or Jelly
Fran Wright
Best decorated Jar
Mrs Beverley Ward


OUR JAM MAKING TIPS
Selecting fruit for your jam and preserves
Choose ripe but not soft fruit and pick through thoroughly to remover any mouldy specimens. Overripe fruit will contain too much water to obtain a good set.
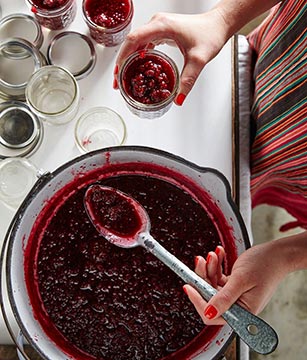
Fruit tends to come in gluts at the height of its season. ‘this is the time to buy or harvest, as they will be at their cheapest and best. But just because you have a fridge full of raspberries, doesn’t mean that you have time to preserve them. In this case, it is possible to do part of the preparation and finish off later. For example, cook the fruit or jelly and leave it to strain, then freeze the resulting juice. Thaw, measure and add the sugar when you have time.
Equipment
Although very little specialist equipment is required, a good preserving pan makes the job a little easier. It should be large with a heavy base and made from good quality stainless steel. Some pans also have measurements marked up the inside, which whilst not essential, is certainly helpful both when adding ingredients and when determining the yield of your preserve. A pouring lip is also useful.
The pan will also have sloping sides and a wide top that allows maximum evaporation, essential for reducing the liquid in your preserve to the right concentration. The large size is also important as it allows your ingredients to come to a rolling boil, vital for a good set, without boiling over. Never fill your preserve pan more than half way.
Jars are fortunately re-useable though you may have to replace the lid. Make sure that if you are re-using a lid, it does not have the taint of its previous contents as this will ruin all your hard work!
Jam jars will come with twist-off lids lined with plastic or rubber, which helps to make an airtight seal. You can of course use wax discs and cellophane covers for your jam. Wax discs are not suitable for vinegar-based preserves as they do not form an airtight seal and vinegar has a tendency to evaporate. You can use jars with plastic-lined screw tops for these or clip-top jars with rubber seals.
Other essential equipment include bowls and basins of varying sizes, for jellies - a jelly bag and stand, small freezer-proof plates, colander, nylon sieve, jam funnel, knives, measuring spoons and jugs, wooden spoons and a good sized chopping board.
Sterilising Jars
Properly sterling your jars, no matter what type you are using is an essential part of your preserve making. All your hard work will be lost if your jam is exposed to any contaminants. As mentioned previously, its really important that you do not re-use jars or lids that have a taint from the previous contents, especially for vinegar based contents such as chutneys.
If you are re-using old jars or lids, wash thoroughly in hot soapy-water and remove all stickers. Rinse in freshly boiled hot water. Leave to dry upside-down on a clean tea towel or kitchen paper.
There are two main methods for heat sterilising your jars. Option one: preheat your oven to Gas Mark 3/170ºC/325ºF. Stand the jars on a baking sheet, trying to avoid them touching and heat in the oven for 10 minutes. Remove from the oven and either fill with hot preserves or leave until cold and fill with cold mixtures. Option two: place the jars in a deep pan and cover with boiling water. Bring to the boil and boil for 10 minutes. Remove with tongs and either fill with hot or leave to cool as before.
It is also possible to sterilise jars in the microwave, please refer to the manufacturer’s instruction book for guidance. As a general guide, fill jars half full of water, place in microwave and microwave on full power until the water boils. Using oven gloves, swill the water around the jars, empty and leave to drain upside-down on kitchen towel or clean tea towel as before.
What makes a good set?
Jams, jellies and marmalades all rely on the right combination of pectin, acid and sugar to achieve a good set. Fruit contains varying amounts of pectin and acid – in fact, the same type of fruit may contain different quantities of acid and pectin year to year, or variety to variety, hence why its important to test.
Acid helps in the process of extracting the pectin from the fruit. It is essential for a good set and helps prevent the crystallisation of the sugar. Fruit that is rich in pectin is usually rich in acid too. There are fruits that require the addition of added acid in the form of lemon juice, redcurrant or apple stock. Your recipe should offer guidance.
High pectin fruit includes blackcurrants, red currants, damsons, quinces, cooking apples, gooseberries and cranberries. Medium pectin fruit includes raspberries, early blackberries, apricots, greengages and loganberries. Low pectin fruit includes strawberries, pears, elderberries, cherries and late blackberries.
Sugar is not just for sweetness. The concentration of sugar in the final preserve will determine whether it will keep well or not or whether the preserve will ferment or crystallise. A good recipe should avoid this happening! Billington's sugar offers a range of unrefined sugars that can give your jams and preserves a subtly different taste. For more information about their range of sugars, including Fairtrade sugar, please visit www.billingtons.co.uk
Testing for a set
There are three main tests for determining whether your sweet preserve has reached setting point. Take the preserve off the heat to ensure that it doesn’t over cook during testing.
Flake test: Dip a clean wooden spoon into the mixture in the pan. Remove it and holding it above the pan, twirl the spoon to cool the mixture slightly. Allow the mixture to fall off the spoon. If the drops run together and form flakes that hang off the side of the spoon, the mixture has reached setting point.
Cold saucer test: Chill a couple of small plates in the fridge or freezer. Put a small blob of mixture onto a small plate and tilt to spread it thinly. Leave it to cool for a minute, then push the mixture around with your finger. If it wrinkles, it’s reached setting point.
Thermometer test: Stir the mixture in the pan. Dip the thermometer into hot water before dipping it into the pan. If the temperature reaches 105ºC/220ºF, setting point should have been reached. Double check using the saucer test to be certain.
Potting
Preserves like to be kept in cool, dark and dry conditions and if the recipe followed has been adhered to, should keep for up to one year. Once opened, all preserves are subject to contamination by airborne bacteria and should be consumed within a few weeks. Keep opened